Installing GA4 in your Eat App widget
The installation process for installing GA4 in Eat App widget requires you to install your GA4 tracking into your booking widget.
If you are brand new to Google Analytics you firstly need to create a new Google Analytics account. Google provides an easy to use setup wizard to walk you through the setup process. Instructions are here.
If you have an old Google Analytics account you will want to use the Setup Wizard inside of Google analytics to create the new GA4 property.
When setting up GA4 in Eat App you want to keep in mind we want to track data from a website, not an iOS or Android app. And also we will using the "manual tag installation" method in GA4 to setup analytics in your widget.
After setup of your GA4 account, open your newly created data stream
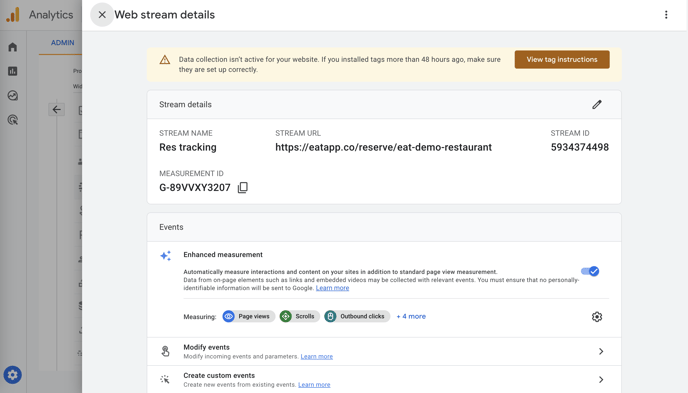
Click "View Tag Instructions" at the top of the page.
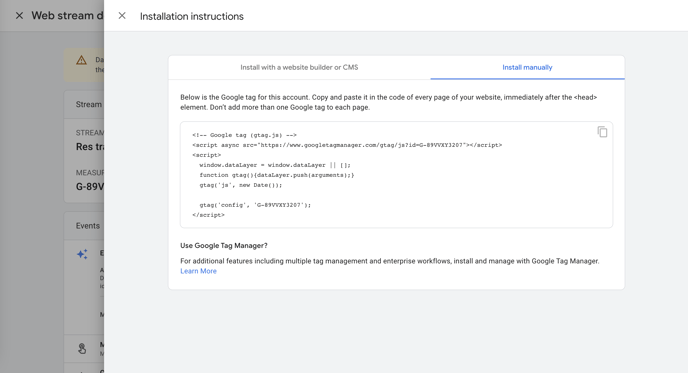
In the install manually tab you will see the code we will be installing in your booking widget. Copy this code by clicking the copy icon in top corner of the tag.
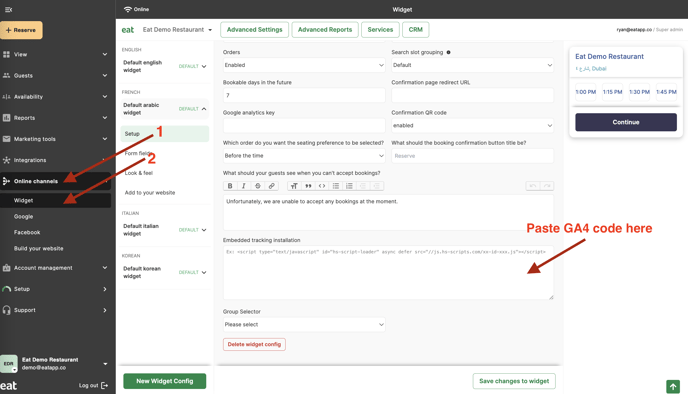
Now head over Eat App
Start by clicking Online channels, and then widget from the sidebar.
Now paste the tracking code you just copied from GA4 into the "Embedded tracking installation" field.
Note: For security reasons, the Embedded tracking code field is not turned on by default. If you would like to activate this feature please contact us and we will enable it for you.
After its pasted, click "save changes to widget" in the bottom right of the window.
You have now installed GA4 in your widget! From now on data will start flowing into your GA4 dashboards.
How to Setup Conversions in GA4
This section explains how to track confirmed reservations as conversion events in GA4. Doing this allows you to see metrics like traffic sources to see where diners came from before they made a reservation. It will also help with ads conversion tracking if you are running Google Ads.
To track conversions in GA4 you need to firstly setup a GA4 event, and then allow your event to be tracked as a conversion.
Creating a GA4 event for a confirmed reservation
In GA4 click Admin, then Events, then Create event

On the next screen click Create
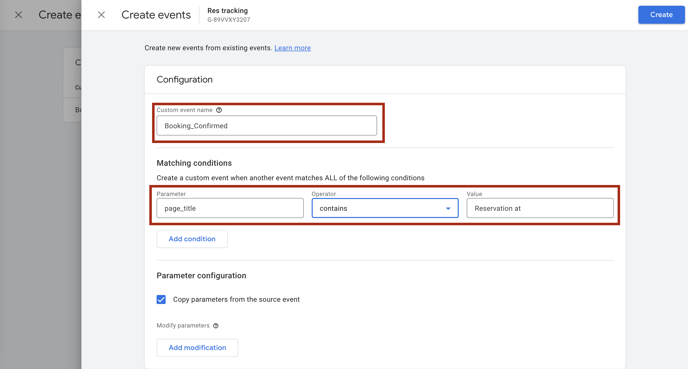
You will now see the new event creation screen.
To create the event we will be using the page_title Parameter to define our new event. This works because our booking confirmed pages have unique page titles we can read off of.
Follow these steps
1. Give your event a name. For example Booking_Confirmed
2. Select page_title as the parameter
3. Select contains as the Operator
4. Type Reservation at as the Value
5. Click create at the top right to create the event.
Note: If you are using Eat App's widget in a different language creating an event is slightly different. Please contact us for instructions on how to setup the event for a language other than English.
Your event creation setup will look like this:
Tracking your event as a conversion
Now you have an event for a confirmed reservation. To finish the process you want to allow this event to be tracked as a conversion.
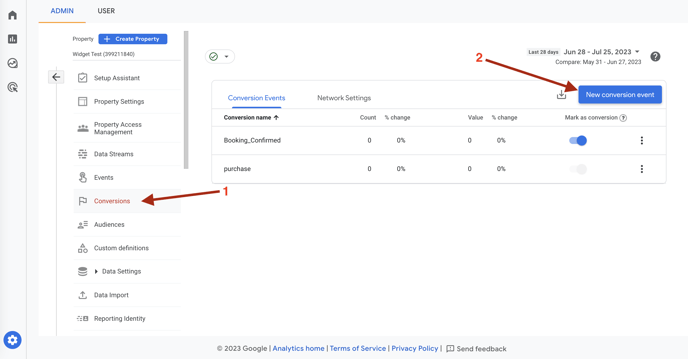
Back in the Admin of GA4 click conversions, then New conversion event
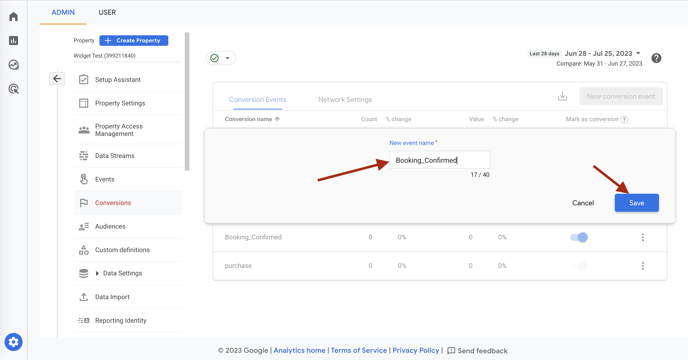
In the field that pops up, type the name you gave your event. In this case we are using Booking_Confirmed. Then click save.
That's it! Your conversion tracking event is now setup in Eat App and will continuously run in the background sending confirmed reservations back to GA4.
Please note it can take up to 48 hours for the data to be showing up in your GA4 reports.