The installation process for installing a Meta Pixel in your Eat App widget requires you to first install your Google Tag Manager (GTM) code into your booking widget.
Installing Google Tag Manager
If you are brand new to Google Tag Manager, you will firstly need to create a new GTM account. To create a GTM account, start by heading here.
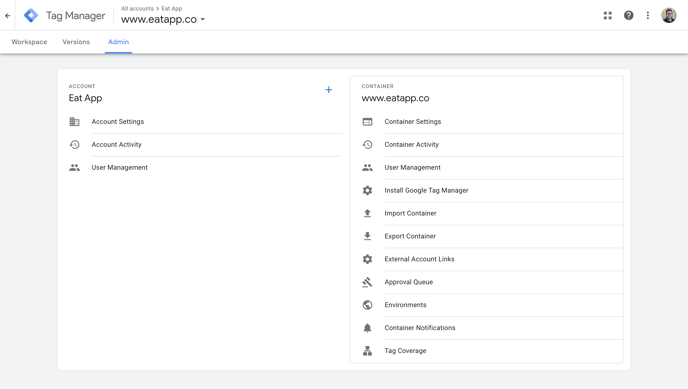
Once your account is setup, navigate into your workspace and click on the admin tab at the top of the screen.

From here, click on "Install Google Tag Manager".
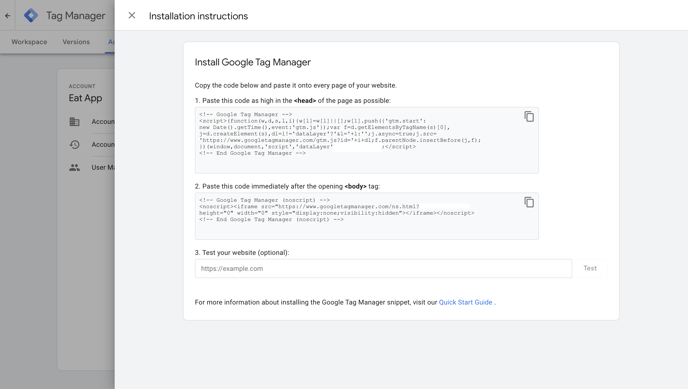
In the next window you will see two blocks of code, you will need to copy them so that they can be added into Eat App.
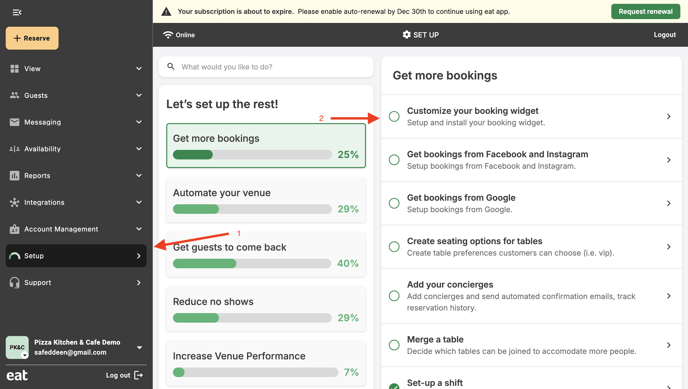
When you have these two blocks of code, jump back into Eat App and start by clicking "Setup" on the left hand sidebar and then click "Customize your booking widget" under the "Get more bookings" section.
Scroll down until you see the "Embedded tracking installation" box. This is where you will need to paste both blocks of code from GTM.
If you do not see an "Embedded tracking installation" box, please reach out to us through either the chat within Eat App or at info@eatapp.co to let us know. We would be happy to assist you with getting it active.
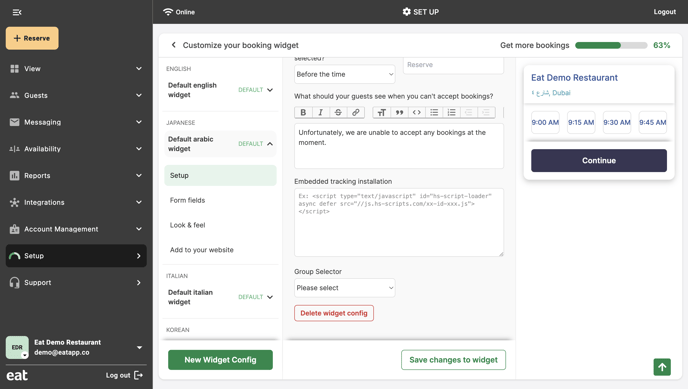
When complete, make sure to click "Save changes to widget" at the bottom of the screen.
You have now successfully added GTM to your Eat App widget.
Adding Meta Pixel to Eat App with GTM
Now that you have GTM added to your Eat App booking widget, setting up your Meta Pixel is a breeze. You will only need your Meta Pixel ID. Click here to learn how to find your Meta Pixel ID.
Once you have your Pixel ID ready, head back to GTM. On the left-hand sidebar, click the "Triggers" tab. Triggers in GTM are rules that define when certain actions happen. In this situation, we will setup a "Pageview" trigger which will then use to fire the Meta Pixel every time anyone views your booking widget.
From the triggers tab, click "New" on the top right. This will open up the trigger creation window. Give this trigger the name "Pageview", set the trigger type to "Page View" and set "This trigger fires on" to "All page views" and then click "save".
When you've saved your trigger, click the "Tags" tab on the left hand sidebar. In GTM, tags are the actions we want to happen when a trigger is fired. In this situation, we've setup a page view trigger - now we want to use tags to load your meta pixel every time a page view on your widget is generated.
Once you are in the "Tags" section of GTM, click "New" on the top right. This will load the tag creation window. Give this tag the name "Meta Pixel". Click "Tag Configuration" and select "Custom HTML". You will need to paste in the below code but replace the two instances of "{your-pixel-id-goes-here} with your pixel ID. Make sure to remove the curly brackets as well.
This event will show up in your events manager as "Schedule".
<!-- Facebook Pixel Code -->
<script>
  !function(f,b,e,v,n,t,s)
  {if(f.fbq)return;n=f.fbq=function(){n.callMethod?
  n.callMethod.apply(n,arguments):n.queue.push(arguments)};
  if(!f._fbq)f._fbq=n;n.push=n;n.loaded=!0;n.version='2.0';
  n.queue=[];t=b.createElement(e);t.async=!0;
  t.src=v;s=b.getElementsByTagName(e)[0];
  s.parentNode.insertBefore(t,s)}(window, document,'script',
  'https://connect.facebook.net/en_US/fbevents.js');
  fbq('init', '{your-pixel-id-goes-here}');
  fbq('track', 'PageView');
</script>
<noscript>
  <img height="1" width="1" style="display:none"
       src="https://www.facebook.com/tr?id={your-pixel-id-goes-here}&ev=PageView&noscript=1"/>
</noscript>
<!-- End Facebook Pixel Code -->
Then under the "Triggering" section, select the "Pageview" Trigger you just created and click save.
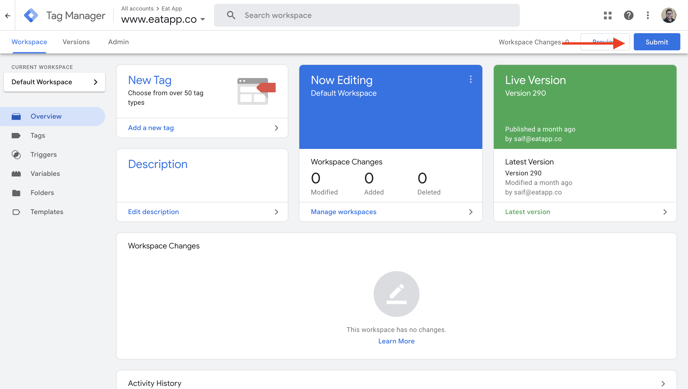
You've now successfully created and setup your Meta Pixel and added it to your Eat App booking widget. When you're done, make sure to click "Submit" on the top right of your GTM view to save your changes.
Setting up Meta Booking Confirmed Conversion Events
Now that you've setup your Meta Pixel through GTM, you can also send booking confirmed events from your booking widget to Meta to be used for advertising.
To start, we need to first setup a booking trigger. Start by navigating to the "Trigger" tab on the left hand sidebar of GTM and then click "New" on the top right. Call this trigger "Booking Confirmed". Under trigger configuration, select "Custom event" and paste in "Booking confirmed" and set "This tag fires on" to "All custom events".
Now that we have setup the booking confirmed trigger, we need to setup a tag that tells Meta when this trigger happens so it can log it in your accounts event manager.
Start by clicking the "Tags" tab on the left hand sidebar of GTM. From here, click "New" on the top left. Give this tag the name "Meta Booking Confirmed". Click "Tag Configuration" and select "Custom HTML". You will need to paste in the below code but replace the two instances of "{your-pixel-id-goes-here} with your pixel ID. Make sure to remove the curly brackets as well.
This event will show up in Meta as "Schedule". Meta does not have a native "Booking" event and so we are using this event to pass data back to Facebook and Instagram.
<!-- Facebook Pixel Code -->
<script>
  !function(f,b,e,v,n,t,s)
  {if(f.fbq)return;n=f.fbq=function(){n.callMethod?
  n.callMethod.apply(n,arguments):n.queue.push(arguments)};
  if(!f._fbq)f._fbq=n;n.push=n;n.loaded=!0;n.version='2.0';
  n.queue=[];t=b.createElement(e);t.async=!0;
  t.src=v;s=b.getElementsByTagName(e)[0];
  s.parentNode.insertBefore(t,s)}(window, document,'script',
  'https://connect.facebook.net/en_US/fbevents.js');
  fbq('init', '{your-pixel-id-goes-here}');
  fbq('track', 'Schedule');
</script>
<noscript>
  <img height="1" width="1" style="display:none"
       src="https://www.facebook.com/tr?id={your-pixel-id-goes-here}&ev=PageView&noscript=1"/>
</noscript>
<!-- End Facebook Pixel Code -->
Then under the "Triggering" section, select the "Booking Confirmed" Trigger you just created and click save.
You've now successfully created a booking confirmed trigger and setup a tag to fire every time a guest makes a booking at your restaurant. These events should start appearing in your Meta events manager within 48 hours. When you're done, make sure to click "Submit" on the top right of your GTM view to save your changes.