Social media is an important way to reach and engage potential diners at your restaurant. Facebook has recognized this, and over the past few years, has added new features for page owners that go beyond just updating their feeds.
-1-1.webp?width=580&height=302&name=Facebook%20Integration%20Rectangle%20(1)-1-1.webp)
With Facebook and Instagram's Call to Action button, restaurants can now add a 'Reserve' button on their restaurant's Facebook and Instagram pages. This is a great way to accept reservations directly from these channels and increase restaurant diners.
The 'Reserve' button lets customers book at your restaurant in a few clicks without the hassle of calling - directly from the Facebook and Instagram app. This feature can be enabled only when restaurants have subscribed to one of Facebook's official reservation partners like, Eat App.
Instructions for taking bookings through social
There are two methods to add a 'Reserve' button on your restaurant profile if you are an Eat App customer.
- Directly through Facebook
- Through Eat App's restaurant settings page
How to add a 'Reserve' button on your FB & IG pages
- Log in to the Facebook page of your restaurant
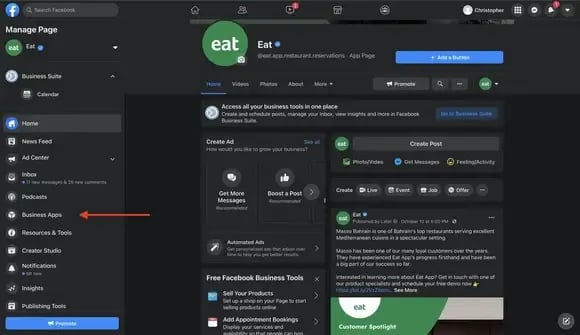
- On the left-hand sidebar of your Facebook page, select Professional dashboard then click on "Business Apps"

3. Scroll down to the "Reservations" category and locate "Eat App" and then click "Connect".

4. You will then be taken to an authorization page from Eat App where you'll need to select the restaurant you would like to connect.
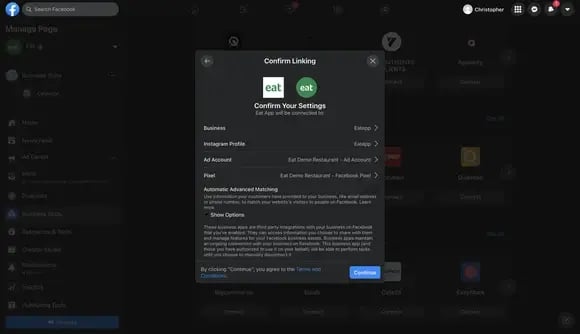
5. Once selected, you will be redirected back to Facebook where you will need to connect your Instagram account, Ad account, and Facebook pixel (these three are required to complete the process).

6. Your "Reserve" button will now be live on both your Facebook and Instagram profiles and you can manage your booking widget settings directly from Eat App.
How to add a 'Reserve' button on your FB & IG
To connect your Facebook and Instagram profiles to Eat App, you can follow these steps:
Video walkthrough
- Log into admin.eatapp.co with your restaurant's username and password
- Click on the "Services" tab once logged in and navigate to the "Instagram" tab
- Click on the "Setup" button, this will open a Facebook login page where you'll need to be logged into your restaurant's Facebook account
- Select ‘Continue’ when prompted to connect Eat App to Facebook
- Ensure that the correct Facebook Page is connected, along with the Instagram Profile, Ad Account, and Facebook Pixel, then select ‘Continue’
- Allow the Eat App Integration to manage business extension and select ‘Next
- Your "Reserve" button will now be live on both your Facebook and Instagram profiles and you can manage your booking widget settings directly from Eat App
Analytics
Once your link is installed, Facebook provides analytics that tells you how many people clicked on your booking link.
As a page admin, hover your mouse over the button and select 'Insights' from the list. Facebook will then display recent click information for your booking link.
What's next?
Now you're all set up to take bookings from Facebook and Instagram, it's time to make sure people are coming to your Facebook page and engaging with your content.
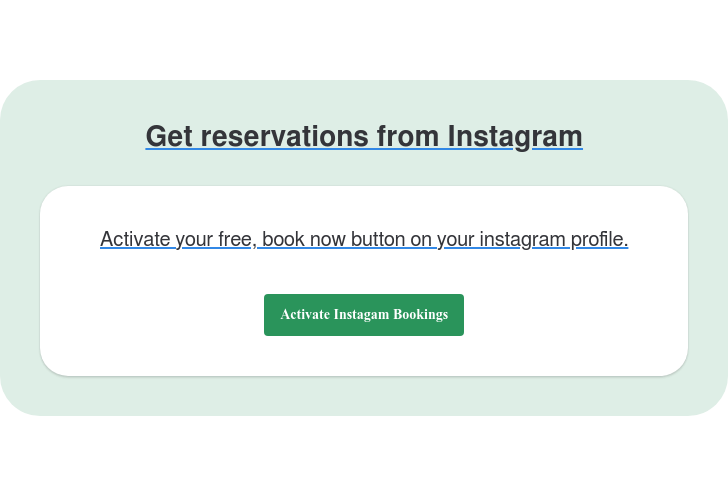
Not using Eat App yet but want to activate Facebook and Instagram bookings? Contact us


-1.png?width=1812&height=1072&name=TripAdvisor%20%26%20More%20Bookings%20(1)-1.png)
-2.png?width=1812&height=1072&name=Google%20Bookings%20(1)-2.png)

.webp?width=200&name=Eat%20App%20Co-founders%20(1).webp)
-1.png?width=200&name=TripAdvisor%20%26%20More%20Bookings%20(1)-1.png)
-2.png?width=200&name=Google%20Bookings%20(1)-2.png)
-1.png?width=200&name=Instagram%20Bookings%20(1)-1.png)
-1-png.webp?width=200&name=Facebook%20Integration%20Rectangle%20(1)-1-png.webp)


.webp?width=200&name=download%20(1).webp)
%20(1)-2.webp?width=200&name=Eat%20(34)%20(1)-2.webp)
%20(1)-2.webp?width=200&name=Eat%20(18)%20(1)-2.webp)


-1.webp?width=670&height=440&name=Facebook%20Integration%20Rectangle%20(1)-1.webp)
%20(1)-1.webp?width=314&height=175&name=Eat%20(45)%20(1)-1.webp)
%20(1).webp?width=314&height=175&name=Eat%20(53)%20(1).webp)
.webp?width=314&height=175&name=image19%20(1).webp)
%20(1).webp?width=314&height=175&name=Eat%20(66)%20(1).webp)


.webp?width=144&height=72&name=Eat%20App%20Logo%20(3).webp)